Wednesday, August 28, 2019

Python-environment-for-deep-learning-in-windows

Python is increasingly becoming a popular programming language for machine learning and deep learning. If you want to use python for training a deep neural network, GPU is preferable rather CPU. This article explains the setting up python environment for deep learning (GPU), especially using Anaconda. Anaconda is a python distribution for scientific computing and machine learning. Follow the below steps to set up the environment.

1. Install Anaconda

Anaconda distribution is available for Windows, Linux, and Mac operating systems. Download the suitable package using the following link : Download Anaconda. After downloading the anaconda distribution, you just execute the setup file and follow the instructions in the wizard.

2. Update Anaconda

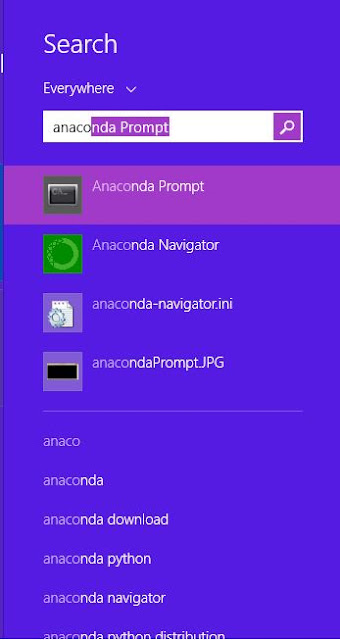
After installing Anaconda, open anaconda prompt. (go to start -> search for anaconda prompt as shown below.)

Anaconda prompt looks like command prompt. there execute following two commands. (see the below figure)
conda update conda
conda update --all


3. CUDA Tool kit and CuDNN installation

After successful updation of Anaconda distribution, you have to install two softwares : (i) CUDA Tool Kit (2) CuDNN. It is note that you have to install compatible softwares based on your OS and GPU. Please follow the links for more information. CUDA toolkit Download CuDNN

4. CuDNN path setting using environment variable

Wednesday, December 5, 2018

Convolutional-Neural-Network-using-keras

In this article, I explain the implementation of Convolutional Neural Network (CNN) using Keras frame work in python. Keras is a high level neural network API to build deep learning models. Now a days, deep learning models have achieved promising results in many tasks in the field of computer vision. CNN is a kind of deep learning model and achieved promising results in image classification tasks. In other words, CNN acts as a powerful image classifier. This article explains the implementation of CNN using keras for hand written digit classification task. Remember, deep networks are the data driven models, i.e., more data is needed for training a deep neural network. For my explanation, I am using MNIST dataset for the hand written digit classification task.

About MNIST dataset:

This dataset contains 60000, 10000 instances in the Training and Testing sets respectively. The following code snippet loads the MNIST dataset in keras. The variables data_train and data_test contains data instances of digits in training and testing sets, where as label_train and label_test stores the labels of training and testing data instances.

#load training and testing data
from keras.datasets import mnist
(data_train, label_train), (data_test, label_test) = mnist.load_data()

We can view the dimensions of variables using the following python code snippet.

#printing dimensions of variables
print(data_train.shape,data_test.shape)

output of the above code snippet: (60000, 28, 28) (10000, 28, 28) From the above output, we have to understand that the training instances are 60000 and testing instances are 10000 respectively. Each data instance (image) dimension is 28 x 28, i.e., training and testing data instances are gray scale images. The following code snippet will be helpful to visualize the images in training and testing sets. It will display four random images in training set.

#displaying the random digits
rand1 = random.randint(1,60000)
rand2 = random.randint(1,60000)
rand3 = random.randint(1,60000)
rand4 = random.randint(1,60000)
cv2.imshow('digit',data_train[rand1])
cv2.waitKey(500)
cv2.imshow('digit',data_train[rand2])
cv2.waitKey(500)
cv2.imshow('digit',data_train[rand3])
cv2.waitKey(500)
cv2.imshow('digit',data_train[rand4])
cv2.waitKey(200)

Since we are working with gray scale images, it is necessary to reshape as explained in following code snippet. In other words, we have to reshape the 28 x 28 images into 28 x 28 x 1 images.

#reshape training and testing data to train and test model
data_train = data_train.reshape(60000,28,28,1)
data_test = data_test.reshape(10000,28,28,1)

In general, we are using class labels are integers (1,2,3,...). It is necessary to convert integers into binary class matrix (i.e. called as one hot encoding). The following code converts integer class labels into binary class matrix labels.

from keras.utils import to_categorical
#one-hot encoding of training and testing labels
y_train = to_categorical(label_train)
y_test = to_categorical(label_test)

Now, this is time for designing CNN for classification task. Here, I have chosen three convolution layers and each layer is followed by activation layer RELU. Then, one fully connected layer and softmax layers are added at the end for classification tasks.

from keras.models import Sequential
from keras.layers import Dense, Conv2D, Flatten
#create model
model = Sequential()
#add model layers
model.add(Conv2D(64, kernel_size=3, activation='relu', input_shape=(28,28,1)))
model.add(Conv2D(32, kernel_size=3, activation='relu'))
model.add(Flatten())
model.add(Dense(10, activation='softmax'))

Now, we have to compile the model to measure the model performance as shown below and then training the model with the chosen options.

#compile model 
model.compile(optimizer='adam', loss='categorical_crossentropy', metrics=['accuracy'])

#training the model
model.fit(data_train, y_train, validation_data=(data_test, y_test),  epochs=1)


with the single epoch, we got validation accuracy on MNIST dataset is 97.93. This is great. By increasing number of epochs, accuracy may increase.
output:
loss: 0.3824 - acc: 0.9464 - val_loss: 0.0693 - val_acc: 0.9793

Friday, March 2, 2018

convolution

Convolution operation plays a vital role in image processing. This is used in many applications in image processing, such as blurring, sharpening, embossing and edge detection etc. By studying this article, one can understand the concept of Convolution operation in image processing in theoretical and practical manner. In addition, it explains the differences between convolution and correlation operations in mathematical and practical manner.

Before understanding the convolution operation, first let me explain the correlation operation in theoretical and mathematical manner. If we want to apply correlation or convolution operation in image processing, we have to define a kernel . The kernel is a small matrix. In general, the kernel is square matrix and the dimension is in odd, for example, 3 x 3, 5 x 5, 7 x 7 ........ etc. The following 3 X 3 kernel has been taken to explain the correlation and convolution operations in this article.

Correlation

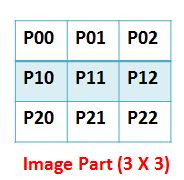
correlation is the process of adding each element of the image to its local neighbors by the weighted kernel. For better understanding, the part of image of size 3 x 3 has been taken as follows.
The correlation is the process of finding the sum of product of similar entries between the kernel and part of the image. Mathematically, it can be expressed as depicted in Equation 1.
In the resulting image, the element at coordinates [1,1] is updated with the resultant value of correlation as shown in Equation 1. This process is subsequently applied to find the rest of the values of elements in the resulting image as depicted in following.


Popular Articles:

1. matlab-cropping-binary-image-algorithm

Objective of the Program: Program takes a black and white image as input. It removes the black portion and gives the white portion of the image.

2. Working-with-ROI-of-image-using-Matlab

Objective of the Program:The part of the image, on which you have interest to work out, is called Region of Interest (ROI). In another words, selected subset of image is called ROI. In some contexts, you want to apply operations on ROI of image rather than the entire image. To achieve this, generally people extract the ROI from the image, store it in another variable and then apply operations on ROI. If you want to apply your operations on ROI without extracting from the image, it is bit difficult. This article will explain the performing the operations on ROI without extracting from the image. In this context, the ROI part of image is affected rather than the entire image.

Wednesday, February 21, 2018

Sobel-Edge-Detection

Sobel-Edge-Detection

If the reader does not know the convolution operation, click this link to understand the convolution operation in image processing: convolution.This article illustrates the how to implement Sobel edge detection without using predefined function. It is very simple to understand and implement. The function naveenSobelXgradient() calculates the horizontal derivative approximation and naveenSobelYgradient() calculates the vertical derivative approximation. Both these functions use the 3 x 3 kernels of Sobel edge detection as shown in following. The function naveenConvolve() do convolution operation between kernels and input image. After finding the X and Y gradients, the gradient magnitude is calculated using either [imgx2 + imgy2] or [abs(imgx) + abs(imgy)]. Here, imgx and imgy are X and Y gradients of given image img. We have used the latter one for calculating sobel edge detection. Python with openCV is used for reading the image file but sobel edge detection is done by the user defined function.

Sobel Kernels for Edge detection

Requirements for execution of code

  1. Python (numpy package)
  2. Opencv (Cv2 package)

Python Code

# Developer : M NAVEENKUMAR, a Research Scholar, Department of Computer Applications, NIT Trichy, Tamilnadu, India
# Objective of this program is to implement sobel edge detection without using Predefined functions.
import numpy as np
import cv2

#a function for convolution operation
def naveenConvolve(img,kernel):
    row1total = img[0,1]*kernel[0,1] + img[0,2]*kernel[0,2] + img[0,0]*kernel[0,0]
    row2total = 0
    row3total = img[2,1]*kernel[2,1] + img[2,2]*kernel[2,2] + img[2,0]*kernel[2,0]
    return row1total + row2total + row3total

#a function for taking part of image to apply convolution between kernel and part of image
def takePartImage(inpimg,i,j):
    image = np.zeros((3,3))
    a = i
    b = j
    for k in range(0,3):
        b = j
        for l in range(0,3):
            image[k,l] = inpimg[a,b]
            b = b+1
        a = a +1
    return image

#a function for finding X gradient
def naveenSobelXgradient(inputimg):
    rows = len(inputimg)
    cols = len(inputimg[0])
    Gx = np.array(np.mat('1 0 -1; 2 0 -2; 1 0 -1'))
    outputimg = np.zeros((rows,cols))
    for i in range(0,rows-3):
         for j in range(0,cols-3):
             # retreve the part of image of 3 x 3 dimension from inputimage
             image  = takePartImage (inputimg, i, j)
             outputimg[i,j] = naveenConvolve(image,Gx)
    return outputimg

#a function for finding Y gradient
def naveenSobelYgradient(inputimg):
    rows = len(inputimg)
    cols = len(inputimg[0])
    #print(rows,cols)
    Gy = np.array(np.mat('1 2 1; 0 0 0; -1 -2 -1'))
    outputimg = np.zeros((rows,cols))
    for i in range(0,rows-3):
         for j in range(0,cols-3):
             # retreve the part of image of 3 x 3 dimension from inputimage
             image  = takePartImage (inputimg, i, j)
             outputimg[i,j] = naveenConvolve(image,Gy)
    return outputimg

#reading an image 
inputimg = cv2.imread('Image path',0);

sobelimagex = naveenSobelXgradient(inputimg)
sobelimagey = naveenSobelYgradient(inputimg)

rows = len(inputimg)
cols = len(inputimg[0])

outputimg = np.zeros([rows, cols])

#finding the gradient magnitude by using the formula [abs(imgx) + abs(imgy)]
for i in range(0,rows):
    for j in range(0,cols):
        outputimg[i,j] = abs(sobelimagex[i, j]) + abs(sobelimagey[i, j])

print(outputimg.size)

cv2.imshow('sobel image',np.uint8(outputimg))
cv2.waitKey(0)

Output

Input image Sobel Output


Follow us on Facebook :


Popular Articles:

1. matlab-cropping-binary-image-algorithm

Objective of the Program: Program takes a black and white image as input. It removes the black portion and gives the white portion of the image.

2. Working-with-ROI-of-image-using-Matlab

Objective of the Program:The part of the image, on which you have interest to work out, is called Region of Interest (ROI). In another words, selected subset of image is called ROI. In some contexts, you want to apply operations on ROI of image rather than the entire image. To achieve this, generally people extract the ROI from the image, store it in another variable and then apply operations on ROI. If you want to apply your operations on ROI without extracting from the image, it is bit difficult. This article will explain the performing the operations on ROI without extracting from the image. In this context, the ROI part of image is affected rather than the entire image.

Friday, February 24, 2017

Datasets-Action-Recognition

Action Recognition: Datasets

Action Recognition is a computer vision task. The objective of the computer vision is to solve real world problems rather than the toy problems. Action Recognition has many real time applications such as human computer interaction, intelligent video surveillance and content based video retrieval etc. In this article, All publicly available datasets for action recognition is given with the download links. In addition, the fall detection and monitoring datasets are given. By studying this article, researchers will come to know the available datasets for action recognition.

In previous days, conventional (RGB) cameras were used for action recognition. The visible light cameras have many limitations such as lack of 3D information and suffering from severe illumination effects. When the low cost depth cameras like kinect available in the market, the research interest on action recognition has been increased using depth data. Hence, the datasets for action recognition using depth data have been in development for research purpose. This article gives the details of popular public available datasets for action recognition.

The following table will give details about the public available datasets for action recognition using depth data.
SNO Name Description No of actions No of Subjects Toal Sequences URL
(Download link)
1 MSR Action 3D

This dataset contains depth sequences pertaining to 20 actions, captured by kinect sensor. There are 10 subjects and each subject perform action two or three times and hence totally 567 depth sequences are produced. It is developed by Wanqing Li during his time at Microsoft Research Redmond. [Single View action dataset]

20 10 567 http://research.microsoft.com/en-us/um/people/zliu/actionrecorsrc/.
2 UTD Multimodel Human Action Dataset The description can be found in the link : "http://www.utdallas.edu/~kehtar/Kinect2DatasetReadme.pdf" 27 8 (4 male, 4 female) 861 http://www.utdallas.edu/~kehtar/Kinect2Dataset.zip
3 UTD Multiview Human Action Dataset The description can be found in the link : "http://www.utdallas.edu/~kehtar/MultiViewDataset.pdf" - - - http://www.utdallas.edu/~kehtar/MultiViewDataset.zip
4 Online RGBD Action Dataset (ORGBD) The description can be found in the link : "https://sites.google.com/site/skicyyu/orgbd" 7 - - https://sites.google.com/site/skicyyu/orgbd
5 UTKinect-Action3D dataset developed by University of Texas at Austin in 2012 10 10 - http://cvrc.ece.utexas.edu/KinectDatasets/HOJ3D.html
6 TST Fall detection dataset v1 The description can be found in the link : "http://www.tlc.dii.univpm.it/blog/databases4kinect#IDFall1" - 4 (AGE:26-27) - http://www.tlc.dii.univpm.it/blog/databases4kinect#IDFall1
7 TST Fall detection dataset v2 The description can be found in the link : "http://www.tlc.dii.univpm.it/blog/databases4kinect#IDFall2" - 11 (AGE:22-39) - http://www.tlc.dii.univpm.it/blog/databases4kinect#IDFall2
8 TST TUG dataset The description can be found in the link : "http://www.tlc.dii.univpm.it/blog/databases4kinect#IDTUG" - 20 (AGE:22-39) - http://www.tlc.dii.univpm.it/blog/databases4kinect#IDTUG
9 TST Intake Monitoring dataset v1 The description can be found in the link : "http://www.tlc.dii.univpm.it/blog/databases4kinect#IDFood" - 35 (AGE:22-39) - http://www.tlc.dii.univpm.it/blog/databases4kinect#IDFood
10 TST Intake Monitoring dataset v2 The description can be found in the link : "http://www.tlc.dii.univpm.it/blog/databases4kinect#IDFood2" - 20(AGE:23-41) - http://www.tlc.dii.univpm.it/blog/databases4kinect#IDFood2
11 RGBD-HuDaAct collected by Advanced Digital Sciences Center Singapore in 2011 12 30 - http://adsc.illinois.edu/sites/default/files/files/ADSC-RGBD-dataset-download-instructions.pdf
12 CAD-60 developed by Cornell University in 2011 12 4 - http://pr.cs.cornell.edu/humanactivities/data.php
13 MSRC-12 dataset(Kinect Gesture) developed by Microsoft Research Cambridge and University of Cambridge in 2012 - - - http://research.microsoft.com/en-us/um/cambridge/projects/msrc12/
14 G3D(Gaming 3D dataset) developed by Kingston University in 2012 20 10 - http://dipersec.king.ac.uk/G3D/
15 Depth-included Human Action video dataset (DHA) developed by CITI in Academia Sinica 23 21 - http://mclab.citi.sinica.edu.tw/dataset/dha/dha.html


Follow us on Facebook :


Popular Articles:

1. matlab-cropping-binary-image-algorithm

Objective of the Program: Program takes a black and white image as input. It removes the black portion and gives the white portion of the image.

2. Working-with-ROI-of-image-using-Matlab

Objective of the Program:The part of the image, on which you have interest to work out, is called Region of Interest (ROI). In another words, selected subset of image is called ROI. In some contexts, you want to apply operations on ROI of image rather than the entire image. To achieve this, generally people extract the ROI from the image, store it in another variable and then apply operations on ROI. If you want to apply your operations on ROI without extracting from the image, it is bit difficult. This article will explain the performing the operations on ROI without extracting from the image. In this context, the ROI part of image is affected rather than the entire image.

Wednesday, November 9, 2016

Convert-Video-to-Sequence-of-Frames

Convert-Video-to-Sequence-of-Frames

By studying this article, one can understand that how to read frame by frame from video using MATLAB.

Convert-Video-to-Sequence-of-Frames


% Program to read frames from a given video 

clear all; clc;
inputvideo = VideoReader('E:/videos/aa.mp4');

%informatin of video 
disp(inputvideo);

%number of frames in video 
no_of_frames = inputvideo.NumberOfFrames; 

%read and write operations frame by frame 
for i = 1 : no_of_frames
    
    frame = read(inputvideo,i);
    frame = rgb2gray(frame);
    strr = 'E:/videos/images/';
    str = int2str(i);
    filename = strcat(strr,'frame',str,'.jpg');
    imwrite(frame,filename,'BitDepth',8);
end


The output of the above code is shown below:

Summary of Multimedia Reader Object for 'aa.mp4'.

  Video Parameters:  29.93 frames per second, RGB24 1920x1080.
                     446 total video frames available.


Follow us on Facebook :


Tuesday, July 26, 2016

life-of-engineering-student

Foreword (by Developer of this blog) : I have been writing the articles to motivate young students for a couple of years. It is my passion to write articles related to inspirational and technical. One day, I asked my student to write an article about Life of an Engineering student in both aspects (academic and professional). As a result, she has written this wonderful article. I am thankful for her contribution to motivate the engineering buddies by this article. I hope that this article will give valuable suggestions to little buddies to get success in their life in both aspects(academic and professional).

Life of Engineering Student

I am writing this article to inspire and motivate the little engineering buddies. It depicts my insight about how I have completed the Engineering Graduation and entered into software company. It reveals facts behind the success story of a graduate student academically and professionally.
Lateefa B.Tech
Program Analyst
Cognizant Technology Solutions
Kochi, Kerala

So here is something that I always wrote of in my diary but now when I am asked to write about it to reach out to my juniors, I am falling short of words. College life is not as it is shown in movies there are perks to it as well pitfalls. On entering college each student finds a new freedom, one which they never had before. This blinds them in a way that most of them don’t realize the importance of being in one. College life has more to it than just fun and I know most would disagree. But truly there is a treasure of knowledge which most of us forget to cherish.

It’s the place where new ideas pop up, zeal to learn awaken our minds. College was where I found my apple of wisdom, I have learnt many lessons and here are a few interesting one for you guys. College has taught me the importance of knowledge and when I say that I mean not knowing but understanding what you learn. There will be many subjects and many extra-curricular activities but there should always be one particular thing that fascinates you the most. If you don’t have one its fine, you can end up being the jack of all trades. But at the end what matters is what knowledge you have gained and what have you taken from the 50 minutes lecture. Once a wise men (profoundly one of my dedicated lecturer in college) said “That no matter how bad a lecture is there will always be at least one new thing you could learn from it”.

When he told that to all my fellow classmates along with me none of us understood the depth of what it meant. But we later realized what he meant was there is always something to learn from a bad book or a bad lecture. In college you get the time to explore new stuff (no matter to which subject it be related to) and you get a practical experience of what you have learnt but this comes only when you put efforts. Hard work always pays of it has paid off for me. I was an average student in college, but enthusiastic enough to question and speak out what I felt and what concerned me it may be regarding subject or the way it was thought. You could only be confident later in important situations in life if you speak out your doubts and thoughts. College provide many opportunities for this. So be always enthusiastic to learn new things. College is the best place to get good genuine friends.

The first year of college is all basics like starters in your meal. Make sure you get your basics right because they are the foundation of what you are going to learn in the next three years of engineering life. Fall in love with coding if you are Computer Science student and non CS folks can also do it because coding is something that fascinates all. I still remember how happy I felt when I executes my first C program. The simple sentence “Hello world” displayed on the screen and made my day since then I never turned back. The more you learn the more excited it gets. It builds a hunger for coding. The happiness of finding a syntactical error that was stopping the entire code from being executed or the happiness in getting a bug fixed or executing your own piece of code (small or big) gives more pleasure. That’s what college gave me a new pleasure. The second important thing that each student should do is: true to yourself, study for yourself, do whatever you do, knowing how it would impact your future. Would it make a difference in life and if yes then think in a good way or in a bad way?

The ultimate goal is to get a job in campus selections for those who want to get into Software Industry. All the tests for 6 or 7 subjects, the labs, the practical exams, the mid exams, the scores, the late night studies and the external exams etc..... all for what? To secure a job in on campus placements, and this goal is realized by most of the students only at the end of third year of college. Then starts the cycle of aptitude learning, reasoning and English (RSWL) skills. It’s the first step towards clearing the initial screening or written exam. After you clear this, you will have to go through technical and HR round. For few MNCs, you will also have other rounds like group discussions, stress interviews etc.

A good preparation is required for this. The college arranges third party trainers to bloom the student in all these aspects including personality development. One should simply learn and practice what has been taught to them and coming to English, one can never master a language in a day, so the best way is to try to speak English with friends while in college, at least during English class. And reading books, no matter to which genre it belongs to, also improves the language skills.

And moving on to the actual experience in corporate life. At first all will be new, you will definitely feel as an outcast but trust me that’s how everyone feels when they are new. so, you are not an exception. You might not know what to do in the beginning and might end up making blunders in the project. You never take such things to heart. Though it would make you feel as a complete idiot, but it will pass. Stop blaming yourself and then one day you will laugh on these incidents. That will always remember that you couldn’t be a genius at the first day of your work.

“Remember It’s not how you fall that matters, what matters is how well you brush up yourself and get back up!!”


See also:
1. Article-on-research-for-phd-scholars
This article will be helpful to the students who want to join PhD and already joined PhD students.

Follow us on Facebook :


Python-environment-for-deep-learning-in-windows

Python is increasingly becoming a popular programming language for machine learning and deep learning. If you want to use python for train...